和对 WebRTC Android 的分析一样,继采集和渲染之后,现在让我们分析一下 WebRTC iOS 的视频硬编码实现。
iOS 的视频硬编码用到的是 VideoToolbox 库,除了编码,VideoToolbox 还提供了解码、转码等功能。我们先了解一下 VideoToolbox 编码的基本工作流程,再看看 WebRTC 对它的使用。
本文的分析基于 WebRTC 的 #23295 提交。
VideoToolbox
使用 VideoToolbox 进行编码的基本工作流程如下:
- 调用
VTCompressionSessionCreate创建编码 session; - 调用
VTSessionSetProperty或VTSessionSetProperties配置 session,例如 profile, level, 码率,关键帧间隔等等; - 调用
VTCompressionSessionEncodeFrame送入未编码数据,在VTCompressionOutputCallback回调里接收已编码数据; - 调用
VTCompressionSessionCompleteFrames「刷出」所有正在编码的数据,类似于 Android MediaCodec 的 EndOfStream; - 调用
VTCompressionSessionInvalidate销毁 session,调用CFRelease释放内存;
不得不承认,iOS 的硬编码比 Android 要方便的多。
官方文档也没有给出示例,那我们就闲话少说,直接看 WebRTC 的代码吧。
创建 session
创建 session 时通常需要指定宽高、码流类型、未编码数据属性、编码数据回调。
// Set source image buffer attributes. These attributes will be present on
// buffers retrieved from the encoder's pixel buffer pool.
const size_t attributesSize = 3;

CFTypeRef keys[attributesSize] = {
  kCVPixelBufferOpenGLESCompatibilityKey,
  kCVPixelBufferIOSurfacePropertiesKey,
  kCVPixelBufferPixelFormatTypeKey
};

CFDictionaryRef ioSurfaceValue = CreateCFTypeDictionary(nullptr, nullptr, 0);
int64_t pixelFormatType = kCVPixelFormatType_420YpCbCr8BiPlanarFullRange;
CFNumberRef pixelFormat = CFNumberCreate(nullptr, kCFNumberLongType, &pixelFormatType);
CFTypeRef values[attributesSize] = {kCFBooleanTrue, ioSurfaceValue, pixelFormat};

CFDictionaryRef sourceAttributes = CreateCFTypeDictionary(keys, values, attributesSize);

OSStatus status =
    VTCompressionSessionCreate(nullptr,  // use default allocator
                               _width,
                               _height,
                               kCMVideoCodecType_H264,
                               nullptr,
                               sourceAttributes,
                               nullptr,  // use default compressed data allocator
                               compressionOutputCallback,
                               nullptr,
                               &_compressionSession);
// 检查 status,释放 ioSurfaceValue, pixelFormat, sourceAttributes
WebRTC iOS demo 输入编码器的数据格式是 kCVPixelFormatType_420YpCbCr8BiPlanarFullRange,宽高可以在 demo 里面设置。
这里需要指出的是,VideoToolbox 编码时,需要输入图像尺寸和输出图像尺寸的宽高比保持一致,否则画面就会出现拉伸或压缩。其实 Android 的 MediaCodec 本身也是不支持裁剪的,要么我们对 YUV 数据自行裁剪,要么我们在绘制到 Surface 里时进行裁剪。
此外,回调函数(第八个参数)传入的是一个函数指针,回调发生时是没有 self 指针的,但第九个参数允许我们传入一个指针,每次回调发生时会作为回调的第一个参数,所以我们可以用它来传递 self 指针。但 WebRTC 这里传的是 nullptr,那如何获取 self 指针呢?答案稍后揭晓。
配置 session
WebRTC 对 session 的配置代码如下:
SetVTSessionProperty(_compressionSession, kVTCompressionPropertyKey_RealTime,
                     true);
SetVTSessionProperty(_compressionSession,
                     kVTCompressionPropertyKey_ProfileLevel, _profile);
SetVTSessionProperty(_compressionSession,
                     kVTCompressionPropertyKey_AllowFrameReordering, false);

SetVTSessionProperty(_compressionSession,
                     kVTCompressionPropertyKey_AverageBitRate, bitrateBps);
// TODO(tkchin): Add a helper method to set array value.
int64_t dataLimitBytesPerSecondValue =
    static_cast<int64_t>(bitrateBps * 1.5 / 8);
CFNumberRef bytesPerSecond = CFNumberCreate(
    kCFAllocatorDefault, kCFNumberSInt64Type, &dataLimitBytesPerSecondValue);
int64_t oneSecondValue = 1;
CFNumberRef oneSecond =
    CFNumberCreate(kCFAllocatorDefault, kCFNumberSInt64Type, &oneSecondValue);
const void* nums[2] = {bytesPerSecond, oneSecond};
CFArrayRef dataRateLimits =
    CFArrayCreate(nullptr, nums, 2, &kCFTypeArrayCallBacks);
OSStatus status = VTSessionSetProperty(
    _compressionSession, kVTCompressionPropertyKey_DataRateLimits,
    dataRateLimits);

// Set a relatively large value for keyframe emission (7200 frames or 4
// minutes).
SetVTSessionProperty(_compressionSession,
                     kVTCompressionPropertyKey_MaxKeyFrameInterval, 7200);
SetVTSessionProperty(_compressionSession,
                     kVTCompressionPropertyKey_MaxKeyFrameIntervalDuration,
                     240);
SetVTSessionProperty 是 WebRTC 里的一个辅助函数,封装了对 VTSessionSetProperty 的调用。
kVTCompressionPropertyKey_RealTime 用来设置编码器的工作模式是实时还是离线,实时会编得快些,延迟更低,但压缩效率会差一些,离线则编得慢些,延迟更大,但压缩效率会更高。本地录制视频文件可以使用离线模式,RTC 场景下为了降低延迟,则需要使用实时模式了。
kVTCompressionPropertyKey_ProfileLevel 用来设置 H.264/H.265 的 profile 和 level,具体定义可以查阅相关规范。iOS 的 demo 可以选择使用 H.264 Baseline 或者 H.264 High profile,选择 Baseline 时使用的是 kVTProfileLevel_H264_Baseline_3_1,选择 High profile 时使用的是 kVTProfileLevel_H264_High_3_1。
kVTCompressionPropertyKey_AllowFrameReordering 用来设置是否编 B 帧,High profile 支持 B 帧,但 WebRTC 禁用了 B 帧,因为 B 帧会加大延迟。
kVTCompressionPropertyKey_AverageBitRate 用来设置平均码率,单位是 bps,这是一个柔性的指标,实际输出码率允许在其上下浮动。kVTCompressionPropertyKey_DataRateLimits 用来设置硬性码率限制,别看这段代码很冗长,实际做的就是设置码率的硬性限制是每秒码率不超过平均码率的 1.5 倍,这也正是 WebRTC 封装 SetVTSessionProperty 工具函数的原因,没看到注释里还有个 TODO 嘛 :)
kVTCompressionPropertyKey_MaxKeyFrameInterval 和 kVTCompressionPropertyKey_MaxKeyFrameIntervalDuration 共同设置关键帧间隔,在 WebRTC 里,每 7200 帧要编一个关键帧,或者每 240s 要编一个关键帧。
更多配置选项,可以查阅 Apple 官方文档。
数据输入
数据输入就比较简单了,直接把 YUV 数据送入 session 即可:
OSStatus status =
        VTCompressionSessionEncodeFrame(_compressionSession,
                                        pixelBuffer,
                                        presentationTimeStamp,
                                        kCMTimeInvalid,
                                        frameProperties,
                                        encodeParams,
                                        nullptr);
第二个参数 pixelBuffer 是 YUV 数据,当然 WebRTC 在把 YUV 数据送入编码器之前,支持做一个裁剪。此外,如果数据格式是 I420,还需要做一个 I420 转 NV12 的操作,格式转换的同时,也支持先裁剪一番。
第三个参数 presentationTimeStamp 是这一帧的时间戳,单位是毫秒,第四个参数是这一帧的 presentation duration,这个概念我在 H.264 标准里没有看见过,WebRTC 也并没有实际传入此参数。
第五个参数 frameProperties 用来指定这一帧的属性,WebRTC 用它来实现请求关键帧。
第六个参数 encodeParams 就很有意思了,编码器允许每一帧数据携带一个自定义指针,编码完成后我们可以拿到这个指针,这样我们就可以让每帧数据携带一些独特的信息了,例如一个额外的时间戳,Android MediaCodec 可没有这个功能。在这里 WebRTC 把 RTCVideoEncoderH264 对象的 self 指针作为这个独特信息的一部分传了进去,所以即便创建 session 时没有传 self 指针,我们也照样玩得转。
数据输出
前面我们在创建 session 时设置了编码完成的回调,这个回调是一个函数指针,它接收的第一个参数,就是我们创建 session 时传入的第八个参数,它接收的第二个参数,就是我们在输入数据时传的第六个参数,后三个参数比较简单,这里就不展开解释了。
// This is the callback function that VideoToolbox calls when encode is
// complete. From inspection this happens on its own queue.
void compressionOutputCallback(void *encoder,
                               void *params,
                               OSStatus status,
                               VTEncodeInfoFlags infoFlags,
                               CMSampleBufferRef sampleBuffer) {
    if (!params) {
    // If there are pending callbacks when the encoder is destroyed, this can happen.
        return;
    }
    std::unique_ptr<RTCFrameEncodeParams> encodeParams(
        reinterpret_cast<RTCFrameEncodeParams *>(params));
    [encodeParams->encoder frameWasEncoded:status
                                    flags:infoFlags
                            sampleBuffer:sampleBuffer
                        codecSpecificInfo:encodeParams->codecSpecificInfo
                                    width:encodeParams->width
                                    height:encodeParams->height
                            renderTimeMs:encodeParams->render_time_ms
                                timestamp:encodeParams->timestamp
                                rotation:encodeParams->rotation];
}
编码数据以及这一帧的基本信息都在 CMSampleBufferRef 中,相关信息的获取示例代码如下:
// 检查是否关键帧
BOOL isKeyframe = NO;
CFArrayRef attachments =
    CMSampleBufferGetSampleAttachmentsArray(sampleBuffer, 0);
if (attachments != nullptr && CFArrayGetCount(attachments)) {
    CFDictionaryRef attachment =
        static_cast<CFDictionaryRef>(CFArrayGetValueAtIndex(attachments, 0));
    isKeyframe =
        !CFDictionaryContainsKey(attachment, kCMSampleAttachmentKey_NotSync);
}


// 获取 pts, dts
CMTime pts = CMSampleBufferGetPresentationTimeStamp(sampleBuffer);
CMTime dts = CMSampleBufferGetDecodeTimeStamp(sampleBuffer);


// 获取 SPS
CMVideoFormatDescriptionRef description =
    CMSampleBufferGetFormatDescription(sampleBuffer);

const uint8_t* sps = nullptr;
size_t sps_size = 0;
CMVideoFormatDescriptionGetH264ParameterSetAtIndex(
          description, 0, &sps, &sps_size, nullptr, nullptr);


// 获取 PPS
const uint8_t* pps = nullptr;
size_t pps_size = 0;
CMVideoFormatDescriptionGetH264ParameterSetAtIndex(
          description, 1, &pps, &pps_size, nullptr, nullptr);


// 获取帧数据
CMBlockBufferRef data_buffer = CMSampleBufferGetDataBuffer(sampleBuffer);
size_t data_size = CMBlockBufferGetDataLength(data_buffer);
uint8_t* data = new uint8_t[data_size];
CMBlockBufferCopyDataBytes(data_buffer, 0, data_size, data);
需要指出的是,编码器输出的数据是 AVCC 格式,WebRTC 将其转换为 Annex-B 格式后,再进行封装和发送。它们是两种 H.264 码流 NALU 存储的方式,简单来说 Annex-B 是 start code + NALU + start code + NALU 的形式,而 AVCC 则是 NALU length + NALU + NALU length + NALU 的形式,具体可以查阅规范,或者这篇中文博客。
调节码率
码率调节和配置 session 时设置码率的方法一样。
说到码率调节,一年多以前我还在 Stack Overflow 上问过 Android MediaCodec 有没有像 iOS 这样设置平均码率 + 最大码率的接口,现在结论已经很明确了,就是没有。
iOS 有个东西倒是没有:bitrate mode。根据文档描述来看,应该是 VBR,因为允许码率在平均码率上下波动嘛。 根据实际测试,从效果上看,应该是 CBR 才对,毕竟 CBR 也不是码率完全不变,小幅度波动还是存在的。
之前在 WebRTC Native 源码导读(三):安卓视频硬编码实现分析中我对 VBR CBR 如何选择给出了一点看法,这里我想补充几点:
- VBR 在画面内容保持静止时,码率会降得很低,一旦画面内容开始动起来,码率上升速度会跟不上,就会导致画面质量很差;
- VBR 上调码率后,有可能导致中间网络路径的丢包/延迟增加,进而导致问题;
- CBR 会存在关键帧后的几帧内容模糊的问题,如果关键帧间隔较短,可以观察到明显的「呼吸效应」;
- WebRTC 使用的方案是 CBR + 长关键帧间隔,这样「呼吸效应」就不是那么明显,而 CBR 确实能增强画面质量;
前两点援引自 Twitch blog。
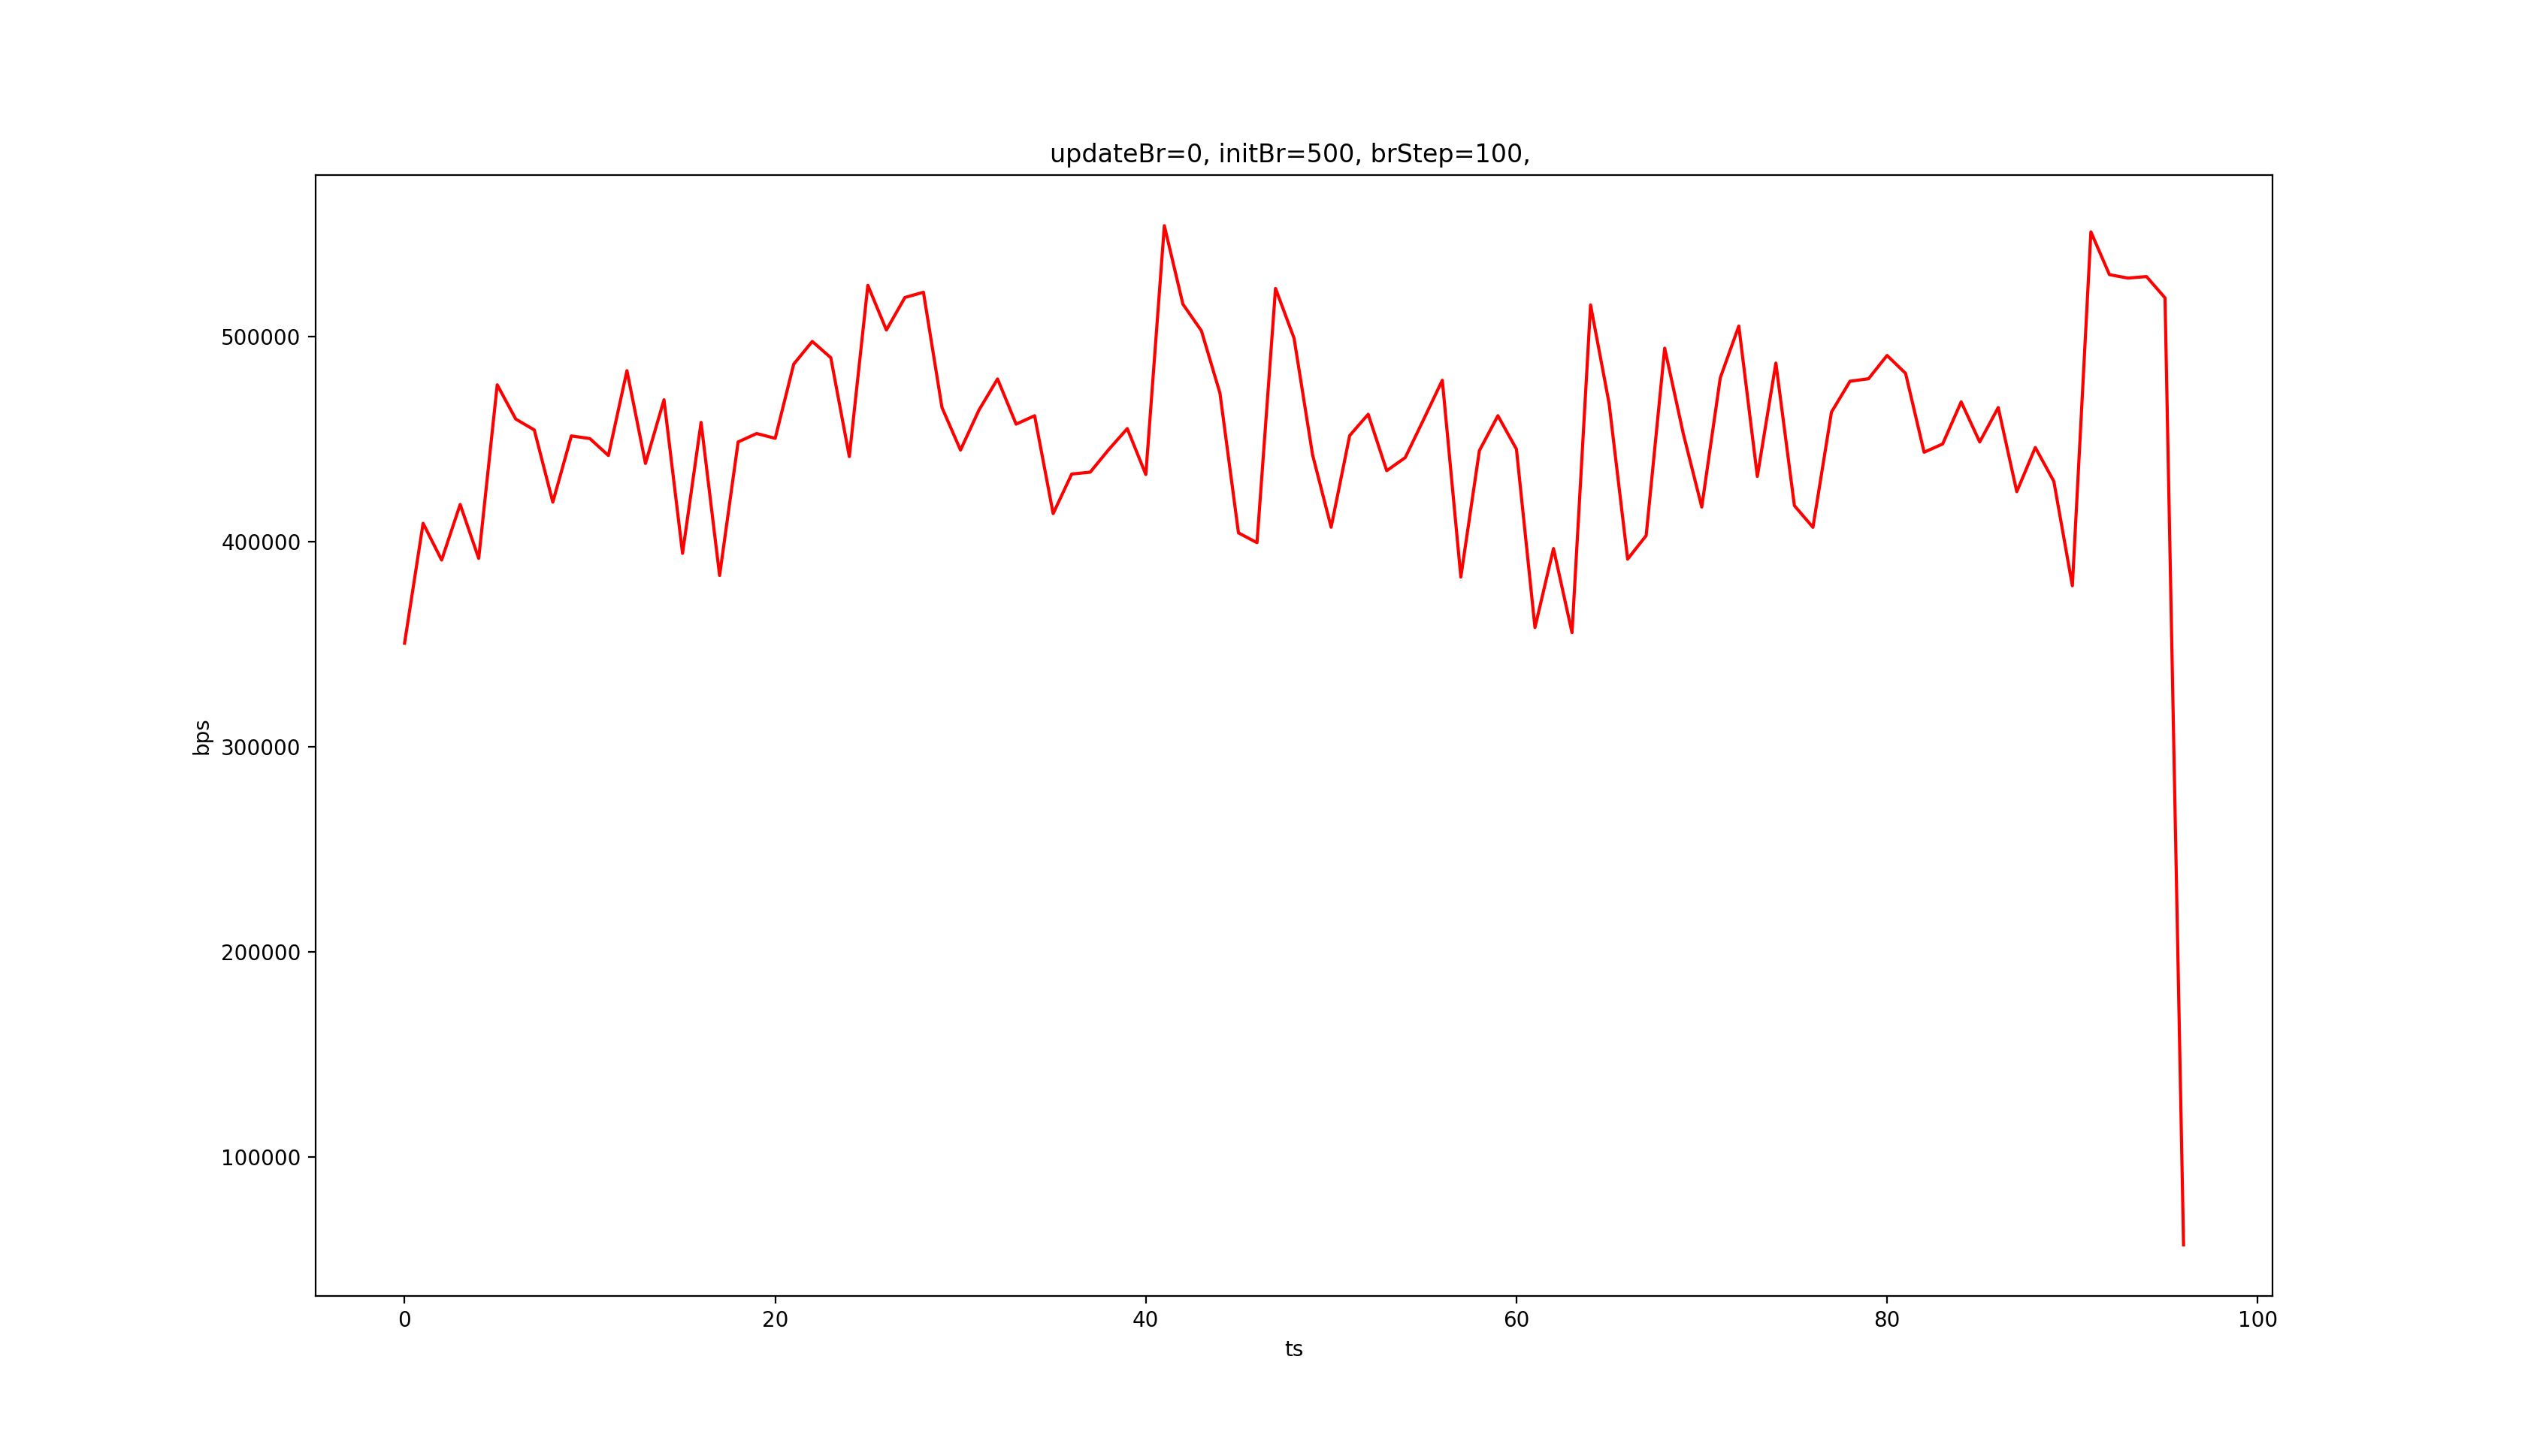
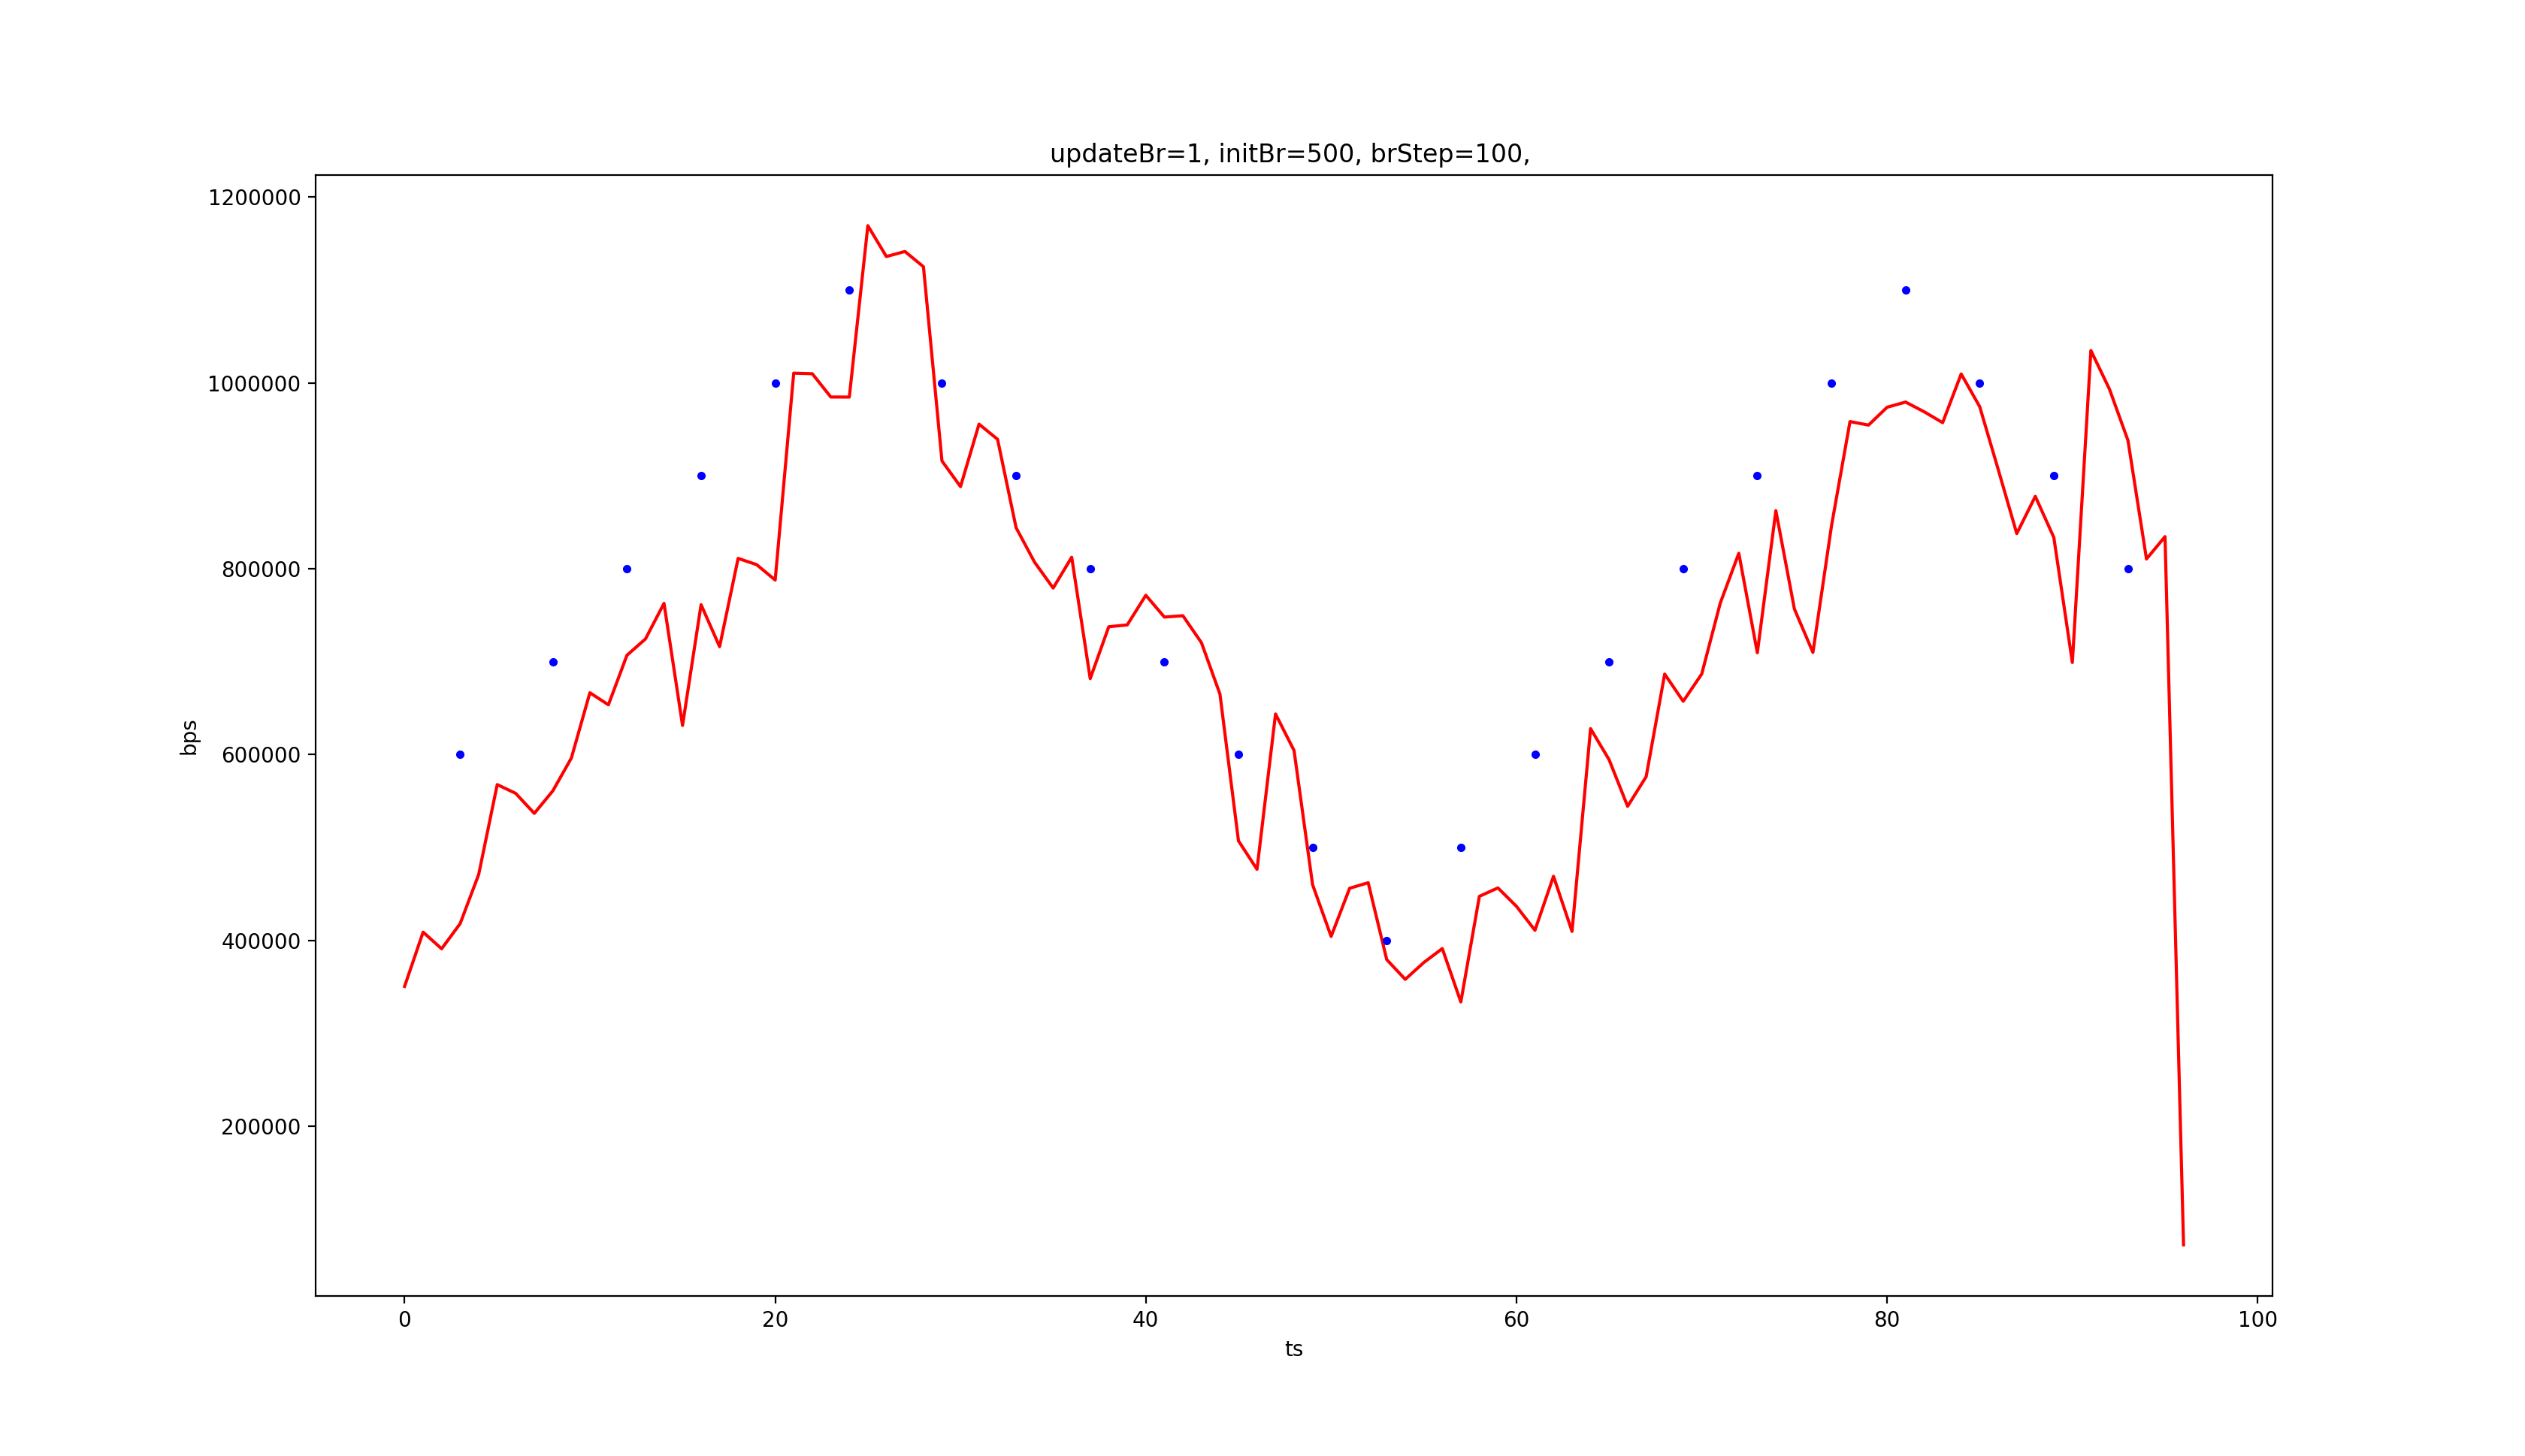
Update 2018.05.10:在分析 Android MediaCodec 视频硬编时,我对各种模式的码率稳定性以及码率调节做了测试,iOS VideoToolbox 虽然没有多种模式可以选择,但仍可以对仅有的一种模式进行测试,下面是测试结果(iPhone 6),完整项目可以在 GitHub 获取。

上图是不调节码率时的码率变化曲线,对比 MediaCodec 的测试结果,我们发现 VideoToolbox 的码率比 MediaCodec 的 VBR 还是要稳得多,和 CBR 差不多。

上图是调节码率时的码率变化曲线,可以看到,表现也和 MediaCodec 的 CBR 差不多。
关键帧
前面我们已经提到了 kVTCompressionPropertyKey_MaxKeyFrameInterval 和 kVTCompressionPropertyKey_MaxKeyFrameIntervalDuration 共同控制关键帧间隔。此外,在编码过程中,我们也可以在编某帧时,主动请求编出关键帧:
CFDictionaryRef frameProperties = nullptr;
CFTypeRef keys[] = {kVTEncodeFrameOptionKey_ForceKeyFrame};
CFTypeRef values[] = {kCFBooleanTrue};
CFDictionaryRef frameProperties = CreateCFTypeDictionary(keys, values, 1);

OSStatus status =
        VTCompressionSessionEncodeFrame(_compressionSession,
                                        pixelBuffer,
                                        presentationTimeStamp,
                                        kCMTimeInvalid,
                                        frameProperties,
                                        encodeParams,
                                        nullptr);
总结
至此,iOS 的视频采集、渲染、编码都已经分析完毕了,原本我打算和 Android 一样把 WebRTC 这块代码摘出来,形成 iOS VideoCRE 库,但头文件实在太多,而且依赖关系太复杂,所以只得作罢 :(
接下来我会尝试把完整的 WebRTC 带到 Flutter 的世界里,形成 FlutterRTC,毕竟我还是比较看好 Flutter 的,敬请期待 :)
欢迎大家加入 Hack WebRTC 星球,和我一起钻研 WebRTC。